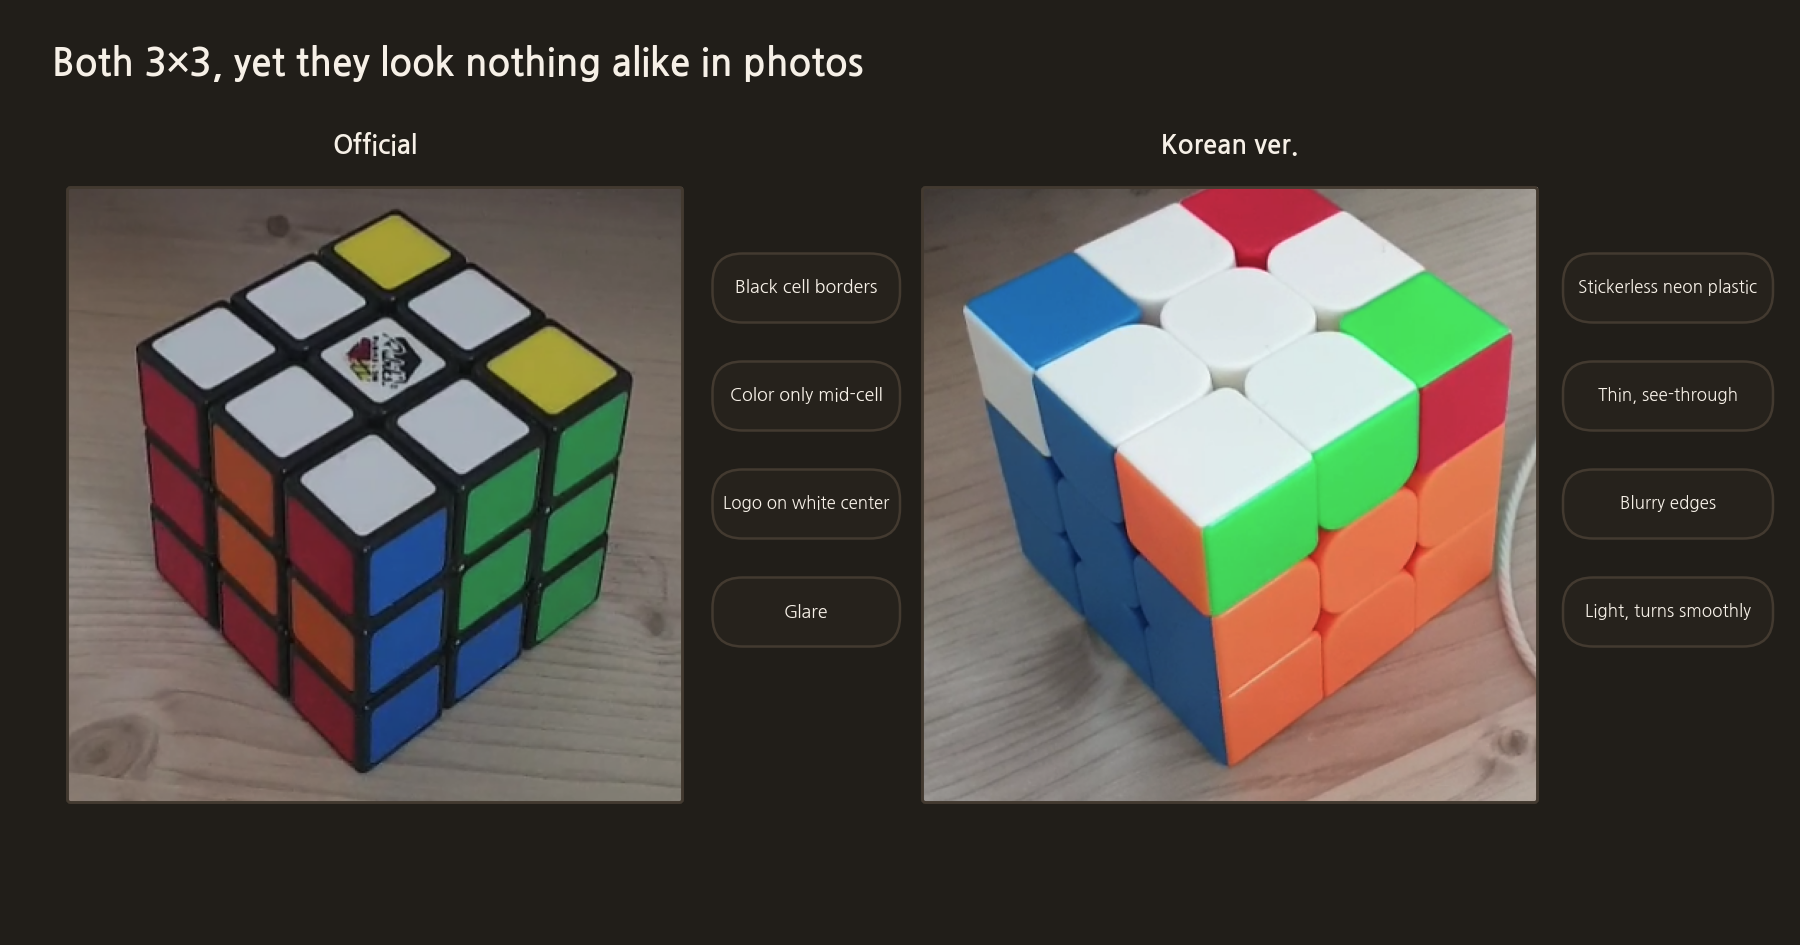
Two cubes
We bought two 3×3 cubes for home.
- Official cube: each sticker has a black border and the colour is concentrated in the middle of the sticker. The white centre has a brand logo, and its gloss reflects light.
- Korean-release cube: light and turns smoothly. On the other hand, it is stickerless fluorescent plastic, so the colours are intense, and it is thin enough that colours from behind show through.
Trying a VLM first
We attached Qwen3-VL-8B, the model used for Go. We showed it both photos at once and asked it to answer the colours of the 9 stickers on each face as letters.
The results were worse than the regular scan. It could barely distinguish colours and often answered with a face filled with a single colour, like RRRRRRRRR. It was not suited to a task that requires pinpointing 9 sticker positions exactly. Today the VLM scan remains only as a helper button that discards blank or single-colour faces and replaces them with the regular scan's result.
C++ colour segmentation
So we read the photos directly in C++.
- Find the cube region in the photo, and shrink large photos to 1280 px.
- Correct the white balance, build several grid candidates for the three faces and average the colour inside each sticker. The edges are excluded to avoid borders and reflections.
- Classify each into one of six colours using HSV and RGB conditions.
- Determine each face by its centre colour and confirm faces one at a time in the order yellow → red → green → orange → blue → white.
- Which photo has white on top is worked out from the brand logo and the ratio of yellow to white. Swapping the photo order gave the same result.
Fix one, break the other
We tuned for the Korean-release cube first. We fixed problems one by one, such as fluorescent green being read as yellow and show-through colours being read as another face's colour, until the first photos were read completely right.
Next we added the official cube, which looked easier, but at first only three of the six faces were found.
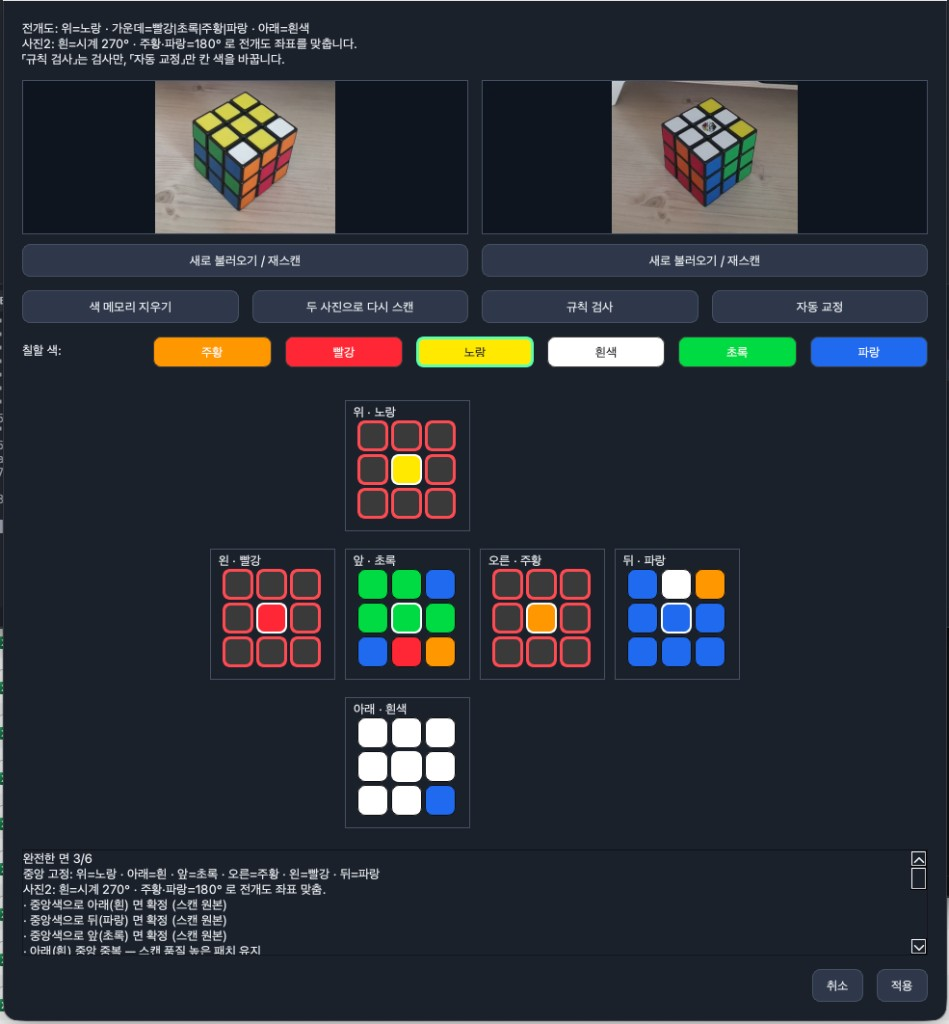
This is the screen from the first read of the official cube. The top, left and right faces were not found.
The black borders help separate the stickers, but straying even slightly outside a sticker mixes in black and the desk colour, confusing white and green. On the official cube, orange and red are also close. Adding conditions for the official cube broke the Korean-release photos again, and we kept going back and forth tuning the two cubes.
CubeModel.cpp, which contains the colour classification, has 230 decimal thresholds, and CubePhotoReconstructor.cpp, the photo recognition file, has 379. They are values hand-picked to fit a few photos whose answers were known.
The actual code for this step
This is the condition that separates yellow from white. Yellow needs a green component similar to its red component, which is also what separates it from orange.
src/CubeModel.cpp
// --- 강한/옅은 특징 ---
const bool strongWhite = (v > 0.62 && s < 0.22 && spread < 0.20)
    || (v > 0.72 && s < 0.28 && spread < 0.25);
const bool paleWhite = (v > 0.55 && s < 0.32 && spread < 0.28)
    || (v > 0.60 && s < 0.38 && deg >= 170.0 && deg < 255.0 && !blueChrome && spread < 0.32);
const bool strongYellow = (v > 0.40 && r > 0.42 && g > 0.38 && b < 0.50
                           && (r + g) > b * 2.4 && deg >= 40.0 && deg < 95.0
                           && g >= r * 0.72 // 노랑: G≈R, 주황(G≪R) 제외
                           && !(g > r + 0.14 && s > 0.45));
const bool paleYellow = (v > 0.38 && r > 0.35 && g > 0.32 && b < 0.58
                         && (r + g) > b * 1.9 && deg >= 38.0 && deg < 100.0
                         && g >= r * 0.70 && !greenChrome);
This is the function that finds the logo on the official cube's white centre. It looks at the ratio of bright to dark points.
src/CubePhotoReconstructor.cpp
bool hasWhiteCenterLogo(const QImage &img, int cx, int cy, int radius)
{
    if (img.isNull() || radius < 2)
        return false;
    int bright = 0, dark = 0, n = 0;
    const int r = std::max(4, radius);
    for (int dy = -r; dy <= r; ++dy) {
        for (int dx = -r; dx <= r; ++dx) {
            if (dx * dx + dy * dy > r * r)
                continue;
            const int x = std::clamp(cx + dx, 0, img.width() - 1);
            const int y = std::clamp(cy + dy, 0, img.height() - 1);
            const QColor c = img.pixelColor(x, y);
            const int sum = c.red() + c.green() + c.blue();
            const int spr = std::max({c.red(), c.green(), c.blue()}) - std::min({c.red(), c.green(), c.blue()});
            ++n;
            if (sum > 400 && spr < 55)
                ++bright;
            else if (sum < 160)
                ++dark;
        }
    }
    if (n < 20)
        return false;
    return bright * 5 >= n * 2 && dark * 20 >= n && dark * 4 <= n;
}
The next post is "3. What 54/54 really meant, the real recognition rate, and distribution".
COMMENTS · CHAPTER 02
Colour segmentation instead of a VLM, and two cubes with different personalities 0 comments
No comments yet. Leave a question or anything you would like to add.
To post a comment, continue with Google and register a nickname and email address.
Continue with Google